![]()
Warning
Once the All button has been used, you cannot double-click on the line to edit the details. If you have made a mistake, the job card completion should be exited without saving and then re-entered.
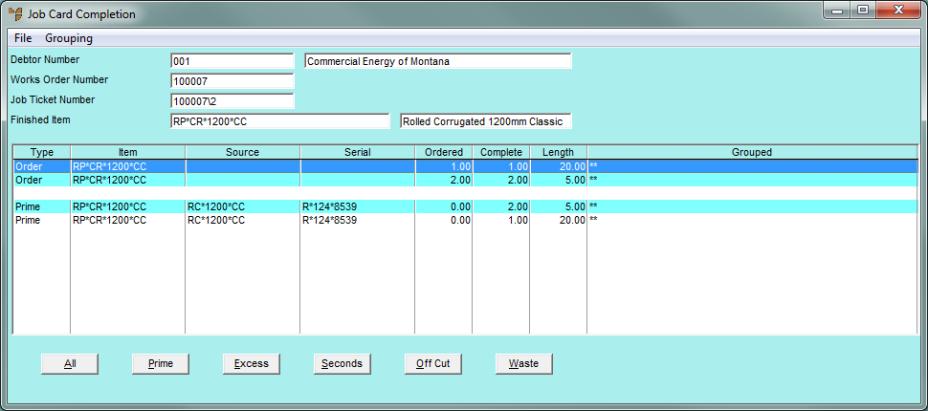
You use the All button on the Job Card Completion screen to allocate raw material coil stock to all the selected job lines (those marked with asterisks).
|
|
|
Warning Once the All button has been used, you cannot double-click on the line to edit the details. If you have made a mistake, the job card completion should be exited without saving and then re-entered. |
|
|
|
Technical Tip Where the Group Job Cards by Class option on the MRF General Configuration screen is set to Yes (refer to "Edit - Applications - MRF"), allowing multiple manufactured items with the same class to be listed on a single job card, you can use the All button to allocate materials to all job lines made from the same coil. You can do this multiple times, e.g. select one group of job lines then select the All button to allocate a coil to those lines, then select a different group of job lines and select the All button again to allocate a different coil to those lines. You can also use the Prime button to allocate materials to each line individually. |
To allocate coil stock:
Refer to "Selecting the Customer Job Card to be Completed".
Toggle the asterisks in the Grouped field off or back on again by selecting a line and pressing Enter or by double clicking a line.
For example, you can partially allocate from one coil by selecting only specific lines, then set the asterisks back on the remaining lines and auto allocate the remainder. If you leave all the asterisks on every line, Micronet allocates all the lines from one coil stock item.
|
|
|
Technical Tip You can also use the options under the GROUPING menu to select the items to be allocated:
|
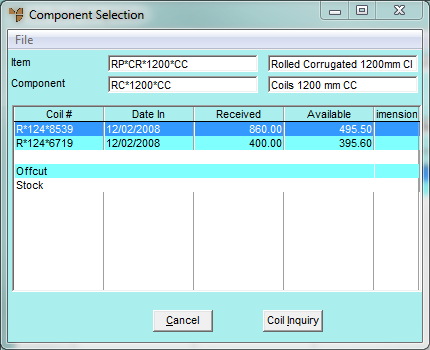
Micronet displays the Component Selection screen.

The screen above shows that stock can be drawn from new coil stock (at the top of the screen), or from offcuts or stock (at the bottom of the screen).
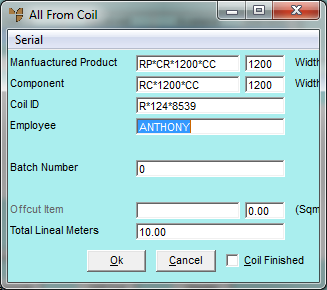
Micronet displays the All From Coil screen.

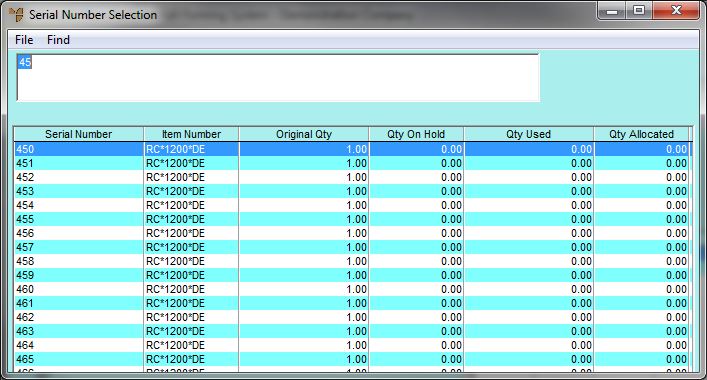
Micronet displays the Serial Number Selection screen.

Micronet displays the All From Coil screen.
|
|
Field |
Value |
|
|
Manufactured Product |
Micronet displays the item number of the item to be manufactured. |
|
|
Component |
Micronet displays the number of the raw material item for the item being manufactured. You can change the component or source coil item if necessary as would be the case if you were to slit this product from a larger coil stock item. |
|
|
Coil ID |
Micronet displays the serial number (coil ID) of the raw material item. |
|
|
Employee |
Enter your employee ID, or press Tab or Enter to select from a list. Employee IDs are setup in the Employee master file in either the Distribution or Job Costing systems (refer to "File - Employee"). |
|
|
Batch Number |
This is an optional field which can be used for quality assurance tracking. The batch number is usually the number from your roll forming computer batch control system. |
|
|
Offcut Item |
If you change the Total Lineal Metres to a value greater than the default, Micronet calculates the difference and displays it in this field as an off-cut (in square metres). You must enter a SCRAPxxxxxx item to post against. You can press Tab or Enter to select an item. If you select a serialised offcut item, Micronet displays the Offcut Units screen. Refer to "Entering Offcut Dimensions". |
|
|
Total Lineal Metres |
Micronet displays the length x quantity for ordered items. You can change this if required but you must then enter a value in the Offcut Item field above. |
|
|
Coil Finished |
If the coil you have selected is now finished, you can tick this box to advise Micronet that the coil status should be checked and/or the coil deleted or completed from your Coil master file. For more information, refer to "Production - Complete Marked Coils". |
Micronet posts the entry you just made and displays the Job Card Completion screen showing the source and coil serial number, along with the quantity completed.

Refer to "Allocating By-Products of a Job".
Refer to "Maintaining Job and Store Cards".
Refer to "Completing Job and Store Cards".